


Hello-hello!
It's been a while since I posted a tutorial on my YouTube channel or here on the blog, but today it's going to change. After a long brake I honestly feel that making a tutorial in the video format would take me too much time, that's why we will be going back to when only picture tutorials were available.
In a very detailed way, I will teach you how to make a mini album with a couple of interactive elements and will include pictures for every step of the process.

The tutorial is created for the La-La Land Crafts and will feature some of the amazing products of the brand:
Summer is Here Collection Rubber Stamp
Celebrate Collection Rubber Stamp (some of the sentiments are from this set)
Summer Dress Marci Rubber Stamp (full size version of the stamp)
Simple Joys Background StampCurved Pocket Die
Filigree Flowers Die
Last year at the La-La Palooza Retreat I taught a class on this album, although the cover and he papers were different back then. A dear friend of mine, Patti, owns this album now :) Hi Patti!!

Last year at the La-La Palooza Retreat I taught a class on this album, although the cover and he papers were different back then. A dear friend of mine, Patti, owns this album now :) Hi Patti!!

Let's begin!
Creating the Cover
First, we will need 3 pieces of medium weight chipboard measuring 6 1/4" X 6 1/4" (2 pc), 6 1/4" X 1 1/4" (1 pc). These will form our album cover.

For wrapping the cover we will need two pieces of cardstock measuring 11" X 7 1/4" & 4 1/4" X 7 1/4". I am using the 8.5" X 11" paper, hence the measurements. If you are using the 12"X12" cardstock, please figure out the measurements based on the pictures that you see below. We need a continuous piece of paper, which will be enough to wrap the chipboard pieces.
I added a strip of score tape to the long side of the smaller paper piece and drew guidelines 0.5" away from the left and bottom edge of the larger paper piece, as well as 0.5" away from the bottom of the smaller paper piece. See the picture below for the reference.

Take the backing off the tape and overlap two cardstock pieces at 1/4", making sure that you don't glue the two together at an angle, but absolutely straight. Use the lines on your cutting mats as your guides.

This is what you should have now:

Apply scor tape along the perimeter of each of the chipboard pieces:

take one of the two large pieces, take the backing off the tape, add wet glue to the central area:

Using the lines that you drew on cardstock before as your guides, glue down the chipboard piece to the paper as shown below:


Next, take the smaller chipboard pieces (this will be the spine of our album), take the backing off the tape, add the wet glue to the central area and using a thick ruler as a spacer, glue the piece down aligning it along the bottom guide line and along the edge of the ruler. You will hold the ruler as shown below:

Once the spine will be glued down to the paper and you'll take the ruler away, you will have a gap between the front cover and the spine. The gap should be about 1/8" or slightly less, but by no means smaller than the thickness of the chipboard that you chose to use for creating the album cover. This gap will ensure that the cardstock will not tear when we'll fold the cover, and the cover will stay flat when the album is folded.
Using the same method and holding the ruler close to the spine now, attach the second large chipboard piece to the paper.
Next, we need to miter all 4 corners of the cardstock. Below you can see that I am using a corner mitering tool. It is important to cut the paper leaving about 1/8" space from the chipboard corner and the cut line. This will ensure that you have enough paper to wrap the chipboard and it will not stay exposed.

After mitering the corners, apply score tape to the outer edges of the chipboard pieces as shown below:

Begin folding the paper edges from the middle and work your way to the sides. Start from the long edges first:


Before folding the short edges, "squish the corners" as shown below, using your bone folder:

The nicely covered corner of the alum cover should look like this:

Our base album cover is ready now.

Adding ribbons to the spine (optional)
**Now it's time for a quick disclaimer. I came across one blog once, and there was a mini album with ribbon bows tied on the spine. It was so cute that I decided to go ahead and add the ribbon to the spine of my album. I absolutely do not remember the name of the person or the name of the blog where I saw this as it was really log ago. If you know what I mean, please drop a link or any other info in the comment below and I will give the proper credit to the person who inspired me. I guess it somehow had to do with the stamps by the Magnolia of Sweden. I remember that there were cute little tildas on the album cover.**
Anyway, we will make a few cuts next to the spine of the album cover, for sliding the ribbon through. I will be using 5/8" wide ribbon. It you plan to use a narrower ribbon or alternatively a wider one, please change the measurements accordingly.
Below you can see where we are going the make the marks and cut the slots for the ribbon:

Cut on both sides of the spine, close to the edge from one mark to another:

At the end of this process you should have 3 pairs of slots. Here is how they will look like on the front of the album cover:

Prepare 3 pieces of ribbon, each about 12 - 14 inches long. After tying a bow, you will trim the ends of the ribbon.

Sliding the ribbon trough the slots can be quite challenging, so just try to find the most convenient way which will work for you, I found that staring at an angle and then pulling and straightening the ribbon worked the best for me.


This is how the cover with the ribbons will look like on the outside:

And on the inside:

Apply a few pieces of scor tape to the spine and the area next to it as show below:

We will cover the spine on the inside of the cover with a piece of cardstock which measures 3.5" X 6 1/8":

Take the backing off the tape, add some wet glue to the central area of the paper piece and aligning it equally from the top, bottom, left and right attach to the spine on the inside of the cover:

This is what you should have:

We can now embellish the cover on the outside with two pieces of patterned paper measuring 6" X 6", and a piece which is 6" X 1 1/8". After that we can tie 3 bows on the spine. to prevent the bows from opening, I added a dot of hot glue to the inside of the each bow.

Is it pretty or what!!?? :)

Creating the base pages
There will be 4 spreads in our album. For making them we will need a few pieces of cardstock, measuring 6 X 6" (2 pc) & 6 X 6 3/4" (2 pc):

Take both of the 6 X 6 3/4" pieces and score them at 6" and at 6 1/4" on the long side:

Add the scor tape to the created flaps as shown below:

Take the backing off the tape on the flap and attach the 6" X 6" paper piece to it. The first pair of album base pages is ready. Repeat the steps to create the second pair.

Add scor tape to the spines of the base pages as shown below:

At this point I cut two pieces of the patterned paper and embellished the insides of the front and back album cover. The papers measure 6" X 6":

Creating Page #1

Prepare another paper pieces measuring 2 3/8" X 10". Score at 2" >> 3.5" >> 6.5" >> 8" on the long side:

Fold this pieces as shown below:

Prepare two more paper pieces measuring 2 3/4" X 5.5". Score both of them at 2 3/4" on the long side:

Take one of the 2 7/8" X 7" paper pieces. Apply glue to the flap as shown:

Mount the paper piece onto the base page so the flap is folded behind the first page. Make sure you attach it flush with the right edge of the base page:


Then attache the second 2 7/8" X 7" paper piece in the same way, but close to the left edge of the page. This is what you should have. There will be a 1/8" gap between two paper pieces:

Flip the page to the back side and score a line on the flaps just along the edge of the page base:

Fold the flaps and burnish them with the bone folder:

Mount the sliding piece that we created earlier as shown below:

This is how it will look like on the back:

Add glue to the bottom flaps and seal closed:

Glue the little folded pices to the page. The first to the left top corner:

And the second - to the bottom right:

The sliding piece will hold the page closed if positioned in the center and will allow opening each of the paper pieces when you'll slide it up or down:

Mat the parts of the first page with the patterned paper of your choice. In my case the red paper pieces measure 2 5/8" X 2 5/8", and the black floral ones - 2 3/4" X 3".
I also cut the oval pieces for gluing down to the sliding element of the page:


The first page is ready now.
Creating Page #2
The second page of our album will have a vertical belly band. For creating it we'll need a piece of patterned paper measuring 5 7/8" X 5 7/8" and a piece of cardstock measuring 7"X2" (scored at 0.5" on the long side):

Fold the 0.5" flap on the narrow piece of cardstock, apply glue to the flap and attach it to the patterned paper in the center, making sure that the cardstock flap is wrapped behind the patterned paper.


Flip the patterned paper to the back side and score a line on the belly band close to the edge of the patterned paper:

Apply glue to the flap, glue down to the designer paper:

For matting the belly band, use another piece of the patterned paper measuring 5 3/4" X 1 7/8":

Glue the patterned paper piece with a belly band to the base page.

Creating Page #3
The next page in the album will have a pocket with an acetate window. Let's begin creating the pocket with cutting a piece of cadstock, measuring 6.5" X 7" and scoring it at 0.5 on both of the 7" sides and on one of the 6.5" sides. Next, apply scor tape to the created flaps, miter two corners as shown below:

Flip the paper to the back side and draw 4 guidelines 3/4" away from the scored lines and from the top edge of the paper as follows:

Cut the central square out:

Take a piece of patterned paper measuring 5 3/4" X 5 3/4" and create 4 guidelines 0.5" away from all of the four edges. Cut out the central area:

Glue down the frame to the front of the window pocket:

Cut a piece of acetate measuring 5 3/4" X 5 3/4", apply scor tape along the perimeter as shown:

Take the backing of the scor tape on the bottom flap of the window pocket, attach to the page:

Fold closed and using a pencil lightly trace the area of the the opening to the base page of the album:

Take the backing off the tape and glue down the acetate to the inside of the window pocket:

The paper piece that you cut out from the patterned paper will be used for matting the central area of the window pocket. Align in the center using the guide lines that you created before and glue down:

Take the backing off the scor tape on the remaining flaps of the window pocket and seal it closed:

Page #3 is now ready:

Creating pages #4 & $5:
The next pair of pages will be a reflection of each other. Each will have a vertical side pocket.
Prepare two pieces of patterned paper measuring and two pieces of cardstock measuring 5 3/4" X 5 3/4", two pieces of cardstock measuring 6 3/4" X 2 1/4" (scored at 0.5 on one short and one long side), and two pieces of patterned paper measuring 1.5" X 5 5/8".

At the intersection of two score lines miter the corner as shown below:

Fold two flaps and wrap the cardstock piece around the patterned paper:

Score a line along the edge of the paper, to create another flap:

Apply glue to the the first short flap, seal down:

Unfold the future pocket while it is glued to the page on one flap, miter the second corner of the pocket piece:

Apply adhesive to the long flap, and then to the short - glue the pocket to the patterned paper.

Mat the pocket with the designer paper. Created another page in the same way. In case you are using a directional patterned paper, mind to which side you should glue down the pockets. One has to be on the left and the second - on the right side of the page.

Before we move on, let's score a spine at every 1/4" using a needle tool. At the picture below you can see light score lines on the inside of the spine:

Taking the backing off the scor tape on the first set of pages and glue them down to the album spine 1/4" away from the front cover. Use the scored lines as your guides. Center the page from top and bottom of the cover:

Glue down the second set of the pages 1/4" from the back cover of the album. This is what you should have now:

Glue the papers with the side pockets to the base pages of the album:

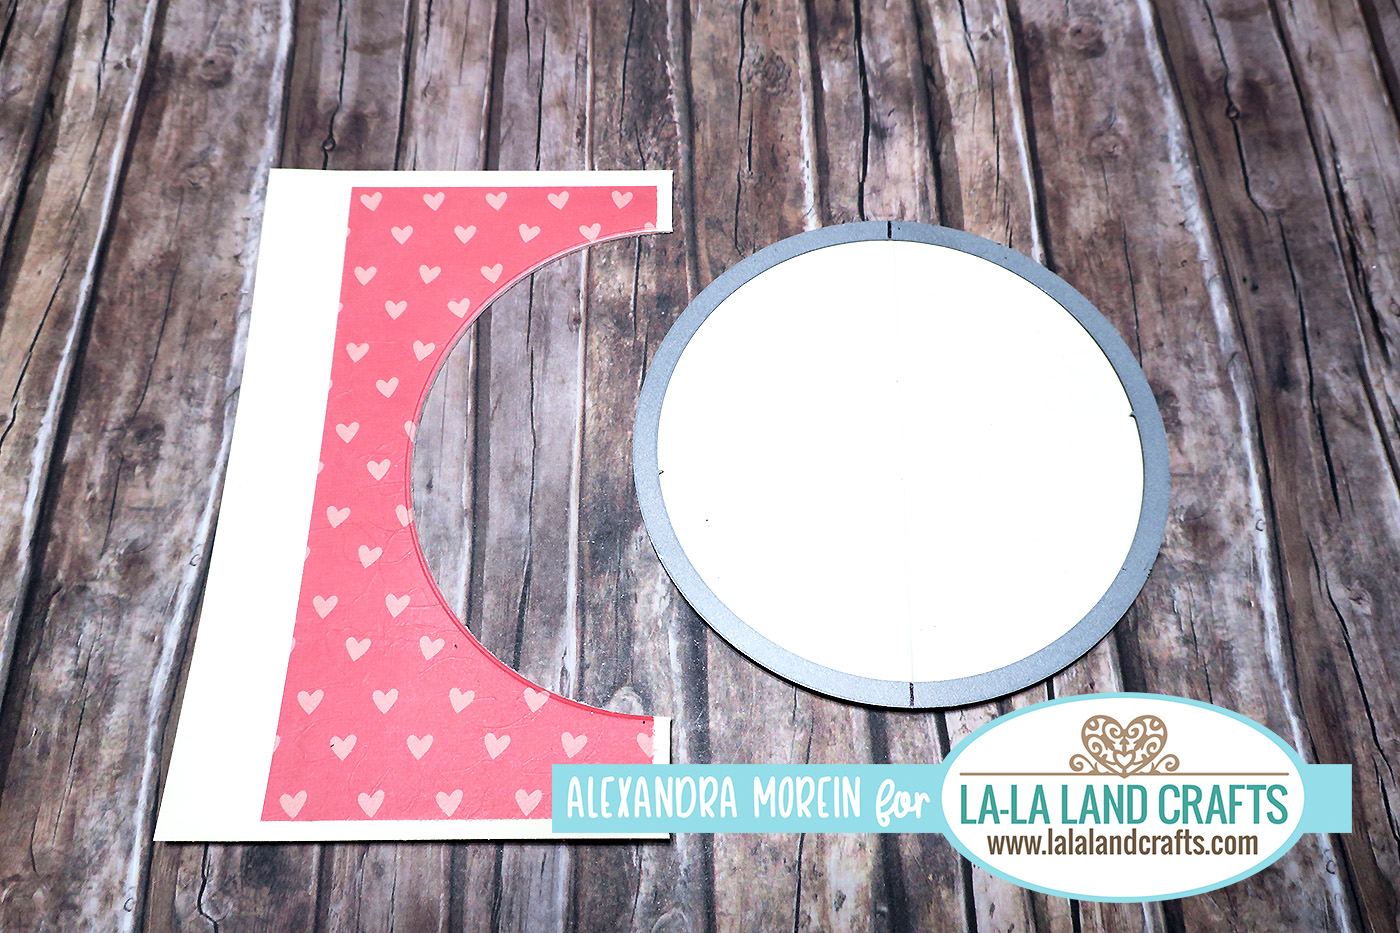
The next set of pages will have s spinner in between. Let's begin with preparing two pieces of patterned paper measuring 2 1/4" X 4.5" and a piece of cardstock measuring 6" X 4 3/4". Score this piece at 0.5" > 3" > 5.5" on the long side.

Next we'll use a circle die to create an opening for the spinner. I am using the largest of the Stitched Nested Circles Die by La-La Land Crafts. At the picture below you can spot the black marks on the die that help me identify where the middle of the circle shape is. I am aligning the marks with the folded edge of the cardstock paper.
As you can see I already adhered the designer paper pieces to the folded cardstock piece:


Then I run the paper and the die through the die cutting machine the second time. Now the circle can easily be detached from the rest of the paper piece:

This is the result that you are going to have at this point:

Next, cut two circles out of the patterned paper using the second largest of the Double Stitched Circles Die and one circle out of cardstock using the second largest of the Pierced Scalloped Circles Die:

Glue down one of the patterned circles down to the cardstock scalloped one:

Secure a piece of waxed hemp cord (or twine) on the back of the scalloped circle. The length of the cord should be about 8".

Cover it with the second patterned circle:

Position the circle in the center of the spinner opening as shown below. I am using Glossy Accents to glue down the corn in the folds of the paper:

Once the cord is glued down, you can trim the tails and add little pieces of painters tape for extra stability on top of the cord ends:

This is the result that you are going to have:

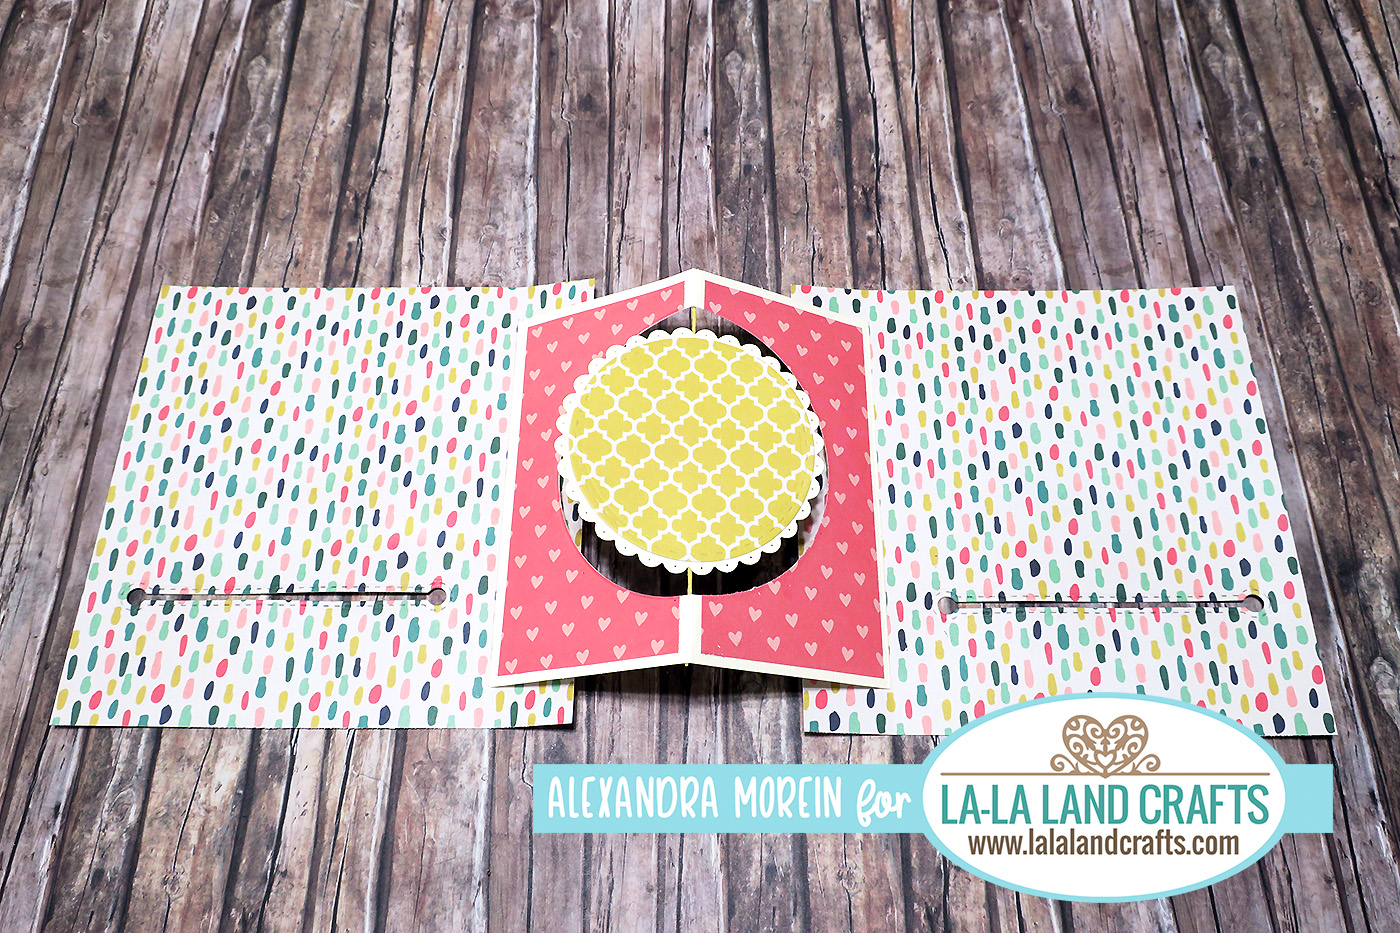
Prepare two pieces of the designer paper measuring 5 3/4" X 5 3/4". Flip them to the back side and draw on each one of them two guide lines 1" away from the edges as shown below. Please mind that when you flip the paper to the front, the guide lines will be on those edges of the paper which will be closer to the spine.
Create then additional marks 0.5" from the top and the bottom of each line:

Cut on the lines from the top mark to the bottom. I slid the ruler into the openings, so that you can see that these are not just plain pieces of paper :)

I wanted to create additional pockets for the tags on these pages, so I went ahead and used the Stitched Slots Die for that purpose, creating the slots about 1.5" away from the bottom of each page:

Now we are ready to attach the spinner element, sliding one of the flaps through the opening:

And gluing down the flap at the back of the page, You will attache the second flap to the second [age in the very same way:

And this is what you'll get:

When you will be gluing the papers with the spinner into the album pages, please don't forget that you have to be able to put a tag into the slot, so do not add glue there. Apply glue to the perimeter of the page, to the area which is close to the flap (as well as on the flap itself) and to the top back section of the patterned paper:

This is how the spinner set of pages will look like once attached to the album:

This is the easiest of the pages, as it it is a complete copy of the page #2 :) Below you can see how it will look like:

Prepare two pieces of patterned paper measuring and two pieces of cardstock measuring 5 3/4" X 5 3/4", two pieces of cardstock measuring 6 3/4" X 2 1/4" (scored at 0.5 on one short and one long side), and two pieces of patterned paper measuring 1.5" X 5 5/8".

At the intersection of two score lines miter the corner as shown below:

Fold two flaps and wrap the cardstock piece around the patterned paper:

Score a line along the edge of the paper, to create another flap:
Apply glue to the the first short flap, seal down:


Apply adhesive to the long flap, and then to the short - glue the pocket to the patterned paper.

Mat the pocket with the designer paper. Created another page in the same way. In case you are using a directional patterned paper, mind to which side you should glue down the pockets. One has to be on the left and the second - on the right side of the page.

Before we move on, let's score a spine at every 1/4" using a needle tool. At the picture below you can see light score lines on the inside of the spine:

Taking the backing off the scor tape on the first set of pages and glue them down to the album spine 1/4" away from the front cover. Use the scored lines as your guides. Center the page from top and bottom of the cover:

Glue down the second set of the pages 1/4" from the back cover of the album. This is what you should have now:

Glue the papers with the side pockets to the base pages of the album:

Creating pages #6 & #7
The next set of pages will have s spinner in between. Let's begin with preparing two pieces of patterned paper measuring 2 1/4" X 4.5" and a piece of cardstock measuring 6" X 4 3/4". Score this piece at 0.5" > 3" > 5.5" on the long side.

Next we'll use a circle die to create an opening for the spinner. I am using the largest of the Stitched Nested Circles Die by La-La Land Crafts. At the picture below you can spot the black marks on the die that help me identify where the middle of the circle shape is. I am aligning the marks with the folded edge of the cardstock paper.
As you can see I already adhered the designer paper pieces to the folded cardstock piece:

It is very unlikely that you will be able to cut at once through 4 layers of paper, that's why after running the paper and the die once through the die cutting machine I take it out and unfold the first layer of the circle. I then place the die back in place, trying to fit in the same grooves where it was before:

Then I run the paper and the die through the die cutting machine the second time. Now the circle can easily be detached from the rest of the paper piece:
This is the result that you are going to have at this point:

Next, cut two circles out of the patterned paper using the second largest of the Double Stitched Circles Die and one circle out of cardstock using the second largest of the Pierced Scalloped Circles Die:

Glue down one of the patterned circles down to the cardstock scalloped one:

Secure a piece of waxed hemp cord (or twine) on the back of the scalloped circle. The length of the cord should be about 8".

Cover it with the second patterned circle:

Position the circle in the center of the spinner opening as shown below. I am using Glossy Accents to glue down the corn in the folds of the paper:

Once the cord is glued down, you can trim the tails and add little pieces of painters tape for extra stability on top of the cord ends:

This is the result that you are going to have:

Prepare two pieces of the designer paper measuring 5 3/4" X 5 3/4". Flip them to the back side and draw on each one of them two guide lines 1" away from the edges as shown below. Please mind that when you flip the paper to the front, the guide lines will be on those edges of the paper which will be closer to the spine.
Create then additional marks 0.5" from the top and the bottom of each line:

Cut on the lines from the top mark to the bottom. I slid the ruler into the openings, so that you can see that these are not just plain pieces of paper :)

I wanted to create additional pockets for the tags on these pages, so I went ahead and used the Stitched Slots Die for that purpose, creating the slots about 1.5" away from the bottom of each page:

Now we are ready to attach the spinner element, sliding one of the flaps through the opening:

And gluing down the flap at the back of the page, You will attache the second flap to the second [age in the very same way:

And this is what you'll get:
When you will be gluing the papers with the spinner into the album pages, please don't forget that you have to be able to put a tag into the slot, so do not add glue there. Apply glue to the perimeter of the page, to the area which is close to the flap (as well as on the flap itself) and to the top back section of the patterned paper:

This is how the spinner set of pages will look like once attached to the album:

Creating page #8
This is the easiest of the pages, as it it is a complete copy of the page #2 :) Below you can see how it will look like:

Adding more elements and embellishing the album
For creating the accents throughout the album I used the succulent flowers from the rubber background stamp set called "Wood Planks":

I colored them using three shades of Copics: R46, RV34, RV32.
For the front cover of the album I created a shaker using the Double Stitched Ovals. I connected the largest and the second largest of the ovals with small pieces of washi tape, in order to cut as many identical "frame" oval pieces for the shaker as I wanted. I stamped the background oval using the rubber stamp called "Simple Joys".

Below you will find the pictures of the album's cover and the pages:


Summer Dress Marci (the mini version of her from the set called "Summer is Here") was colored with Copics.
Skin: E04, E11, E00, E000
Hair: E18, E15, E13
Head band and shoes: R46, RV34, RV32
Dress: YG45, BG34, BG32, BG11


Below is {again} the full list of the La-La Land products that I used for creating this mini album:
Celebrate Collection Rubber Stamp (some of the sentiments are from this set)
Summer Dress Marci Rubber Stamp (full size version of the stamp)
Simple Joys Background StampCurved Pocket Die
Filigree Flowers Die

Feels like it's been forever!!!! Thanks for staying tuned till the end!
Have a great creative day!

Gorgeous creation.
ReplyDelete