Tuesday, September 29, 2015

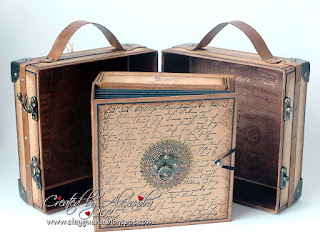
Vintage Style Suitcase - Tutorial - Part 2

Hello!

---------------------------

01/11/2015 - Update
There's a full kit for making this suitcase and an album available for purchase from 'Photographs and Memories'. Hurry to get your copy of the kit:


---------------------------

Another update on the Suitcase Tutorial - Part 2 is done!


Here are some measurements for you to follow:

Chipboard for the album covers, spine and outer walls of the drawer:
6" x 6" (2 pc)
6" x 2 1/4 (the album spine)
6" x 1.5" (the back outer wall of the drawer)
6" x 5 5/8" (the separating element)
5 5/8" x 1.5" (2 pc) - outer side walls of the drawer

Chipboard for the drawer:
5.5" x 5.5" - for the bottom base
5.5" x 1 3/8" (4 pc) - for the inner sides
5 7/8" x 1 5/8" - for the outer covering panel

Card stock for the hidden hinge binding (which will hold 6 pages):
5 5/8" x 9 1/4"

Score marks on the hidden hinge piece:
1 3/4" > 2 1/8" > 2.5" > 2 3/4" > 3 1/8" > 3.5" > 3 3/4" > 4 1/8" > 4.5" > 4 3/4" > 5 1/8" > 5.5" >
5 3/4" >  6 1/8" > 6.5" > 6 3/4" > 7 1/8" > 7.5".


Here is the link to the video tutorial on You Tube:


Thanks for visiting!


Hugs,
Alexandra

Monday, September 28, 2015

Vintage Style Suitcase - Tutorial - Part 1

Hello dear friends!

---------------------------
01/11/2015 - Update
There's a full kit for making this suitcase and an album available for purchase from 'Photographs and Memories'. Hurry to get your copy of the kit:

---------------------------

The current post is for those of you who follow my blog because of the mini albums, and not for cards :)

I'm happy to update you that the first part of the tutorial for making a vintage style suitcase is up and waiting for you on my You Tube channel.


Here is the link:


Here are some of the measurements you'll need to know in order to create the suitcase of your own:
Chipboard:
6.5" x 6.5" (2 pc)
6.5 x 2 1/4" (4 pc)
6 5/8 x 2 1/4" (4 pc)
Card stock structure strips:
6.5 " x 1" (scored at 0.5" on the 1" side) - 8 pc
2 1/4 " x 1" (scored at 0.5" on the 1" side) - 8 pc

12" x 12" card stock for wrapping the 2 parts of the suitcase's base (2 pc)

I've also made 7 straps for embellishing the suitcase's sides and for the handles. Each of them was 12" long and 0.5" wide. I colored the straps with Vintage Photo Distress Stain first, and then covered them with Distress Crackle Paint for achieving a leather-look. You make come up with some way of embellishing.

Here are some of the links to the metal embellishments I've used, which were purchased from Ali Express:
Swing Clasps
Brass Hinges
Corner Covers
Bronze Brads

Thanks for watching.


Hugs,
Alexandra

Saturday, September 26, 2015

Winter Warmth by Lisbeth for LDRS Creative

Hello dear visitors!
My today's post is for the Little Darling Rubber Stamps Creative design team and I want to share a card made with one of the stamps from the recent release - "Winter Warmth" by Lisbeth.


Colored with Copics:
Skin: E04, E11, E00, E000, E0000
Hair: T8, T6, T4
Outfit: T6, E09, E07, R24
             E59, E57, E55
             E79, E77, E74, E71, E70
             E13, Y38, Y35, Y13
             C5, C3, C1

Here are the details and close-ups:


The dies I used here are from the Craft Passion, Noor Design, Magnolia, Simon Says Stamp, Go Kreate, La-La Land Crafts.
The Flowers are all from I Am Roses.


Thanks for stopping by.


Hugs,
Alexandra

Friday, September 25, 2015

Baby Marci With Rattle

Hello dear visitors!

I'm here today with a card, which I created for the La-La Land Crafts design team, and it features the following stamp and dies:
Baby Marci With Rattle
Baby Clothesline Banner
Baby Rattle
Palm Tree


Marci is colored with copics:
Skin: E04, E11, E00, E000 + RV21
Outfit: RV99, RV95, RV93, RV91
            E35, E33, E30
            RV14, RV13, RV11, RV10

Here are some additional views of the details:


Make sure to have a look at the cards created by other ladies from the Team Friday at the official La-La Land Crafts blog.

If you are a La-La Land fan, please share your creations with us in the Facebook Group.


Hugs,
Alexandra

Thursday, September 24, 2015

Vintage Style Suitcase with a Drawer-Album

Hello everyone!

---------------------------------
01/11/2015 - Update
There's a full kit for making this suitcase and an album available for purchase from 'Photographs and Memories'. Hurry to get your copy of the kit:


----------------------------------
I have a warning before I begin, that this post is PICTURE HEAVY!

So, today I've finished one more vintage style project, that I have been working on for the last 3 days.
It includes a suitcase and a drawer album. The album and a drawer are ONE piece, and share the same spine. There were times when I wanted to have a drawer in a photo album for the non-standard size pictures and really small ones too, which keep on falling out of the album and the fact gets on your nerve :)


Anyway, the initial inspiration for creating a suitcase came from a truly amazing crafter Andrew Roberts. I adore his way of using hardware parts in his projects and his "engineering" ideas too.

The idea of combining a drawer and the album as they are presented in this post is mine and was not inspired by any other person or project.

No designer paper was used here, only black & craft card stock, painted with Walnut Stain/Vintage Photo distress ink and stamped with different stamps from my stash.

Here goes my suitcase and an album:


I've uploaded a video to my YouTube channel in which I'm showing you the suitcase and flipping through the album' pages, in case you want to have a "live" look at it.


Thanks so much for stopping by.

Hugs,
Alexandra