If you are subscribed to the La-La Land Craft Club kit, this is what you will be getting this month:
April 2016 PRODUCT KIT includes: Stamps
- On the Farm Marci
- Hey There Stamp Set
Dies
- Stitched Pennants - Country Fence - Tree Branch
(this Kit is valued at $77.85)
As usual, each of the design team members created two projects, using only the stamps and dies from the kit. My first card is this:
Marci was colored using Copic markers: Skin: E04, E11, E00, E000, E0000 Hair: N9, N7, N5, N3 Outfit: E47, E44, E43, E40
E57, E55, E53, E50
R89, R85, R83, R81
The flowers and the tiny leaves which I used on my card are from the I Am Roses. I've also spelled the word hello using clay letters which were made with the help of the mold from Martha Stewart:
Every layer is mounted on chipboard to create dimension
Here is my second creation using the same stamp and the dies:
Marci is colored with the following Copics: Skin: E04, E11, E00, E000, E0000 + RV21 Hair: E11, E15, E18 Outfit: BG09, BG07, BG05, BG01
V17, V15, V12, V000
RV69, RV66, RV63
Except for the shape die (which is from GoKreate), the rest of the dies used on this card are from the April club Kit. The flowers are from I Am Roses.
To see other projects created by the DT with the kit, please visit the La-La Land Crafts blog.
I am super busy these days trying to finish several projects for the upcoming posts on my blog, which I have to share before going on a long (3 weeks!) vacation to see the family and friends in Israel.
Among other things, I wanted to share some happy news with you - I passed the final round audition and will be joining the fabulous design team of Graphic 45 for 2016-2017. The DT term will begin on the 1st of June and it means that you will be seeing a lot of Graphic 45 papers and a lot of new projects here on my blog and on my YouTube channel as well.
I feel very excited, almost as if I won an Oscar! LOL I want to thank everyone who sent me sweet congrats messages, I feel very honored that you found time to drop me a line.
If you want to have a look at the amazing tutorials submitted by the finalists, please visit THISpost on Graphic 45 blog. There are 15 tutorials and each one is unique and special.
And these are the talented people that I will be working with:
My todays card is for the I Am Roses Design Team. Every 15th of the month we start a new Anything Goes monthly challenge and invite all of you to participate in it. Come, join us!!!! You use so many great flowers on your cards, so what not to share them with us and win some great new flowers from the I Am Roses brand!? Hop to link your card here.
I especially love the mini lilies, they are perfect and so tiny! The die cut doily is from Noor Design. The rules of entering the challenge are as follows:
The challenge runs April 15th - May 8th (Ends 11:55pm PST)
Theme: "Anything Goes"
Minimum (2) I Am Roses Products
One project submission per participant
One winner will be chosen
Participants will upload their project to their blog or forum, Label it “APR IAR Challenge”
Participants will add a direct link to their project using the InLinkz tool provided. (*if you are unable to use the tool, leave a comment to this blog post and leave a direct link to your project)
Must Subscribe/or be a Follower of the IAR Challenge Blog
Winner will be announced alongside the next NEW monthly challenge on the 15th
As some of you may know, Graphic 45 announced on their blog the names of the TOP30 finalists for the 2016 Design Team, and my name was mentioned there too!!! I feel extremely honored and happy!
For the second and the final round of the DT call, the finalists were asked to create a video tutorial of one project OR to create a video with a description of 3 projects which represented them as designers.
Those who follow my blog and You Tube, must know what I chose LOL.... Tutorial!! Exactly!!!
I should mention that coming up with an idea for a project, for me personally, is much harder then the process of its implementation. There are 3 new collections of papers which have been recently released by G45 - "Enchanted Forest", "Voyage Beneath the Sea" and "Cityscapes". I decided to have a closer look at the papers themselves and let them choose for me, what to create. Might sound strange, but this is exactly what happened, when I saw a pattern with lots of postage stamps on a sheet from the "Cityscapes" collection. I remember my dad's collection of postage stamps, which he kept in a large stamp holder and being a little girl I adored flipping through its pages, looking at the different stamps and beautiful vintage postcards. From here to there - I decided to create a cute stamp holder and to cut out the stamps from the "Well Traveled" paper. Of course, the holder needs to be placed inside something - from here comes the idea to create a trunk, and to put a magnifying glass and an album with the stamps inside.
The best way of getting inspiration for creating a box or a trinket, is by searching through the vintage Chinese boxes in Google. I found one which served as a base for my trunk.
I'm talking a lot today, right!? :)
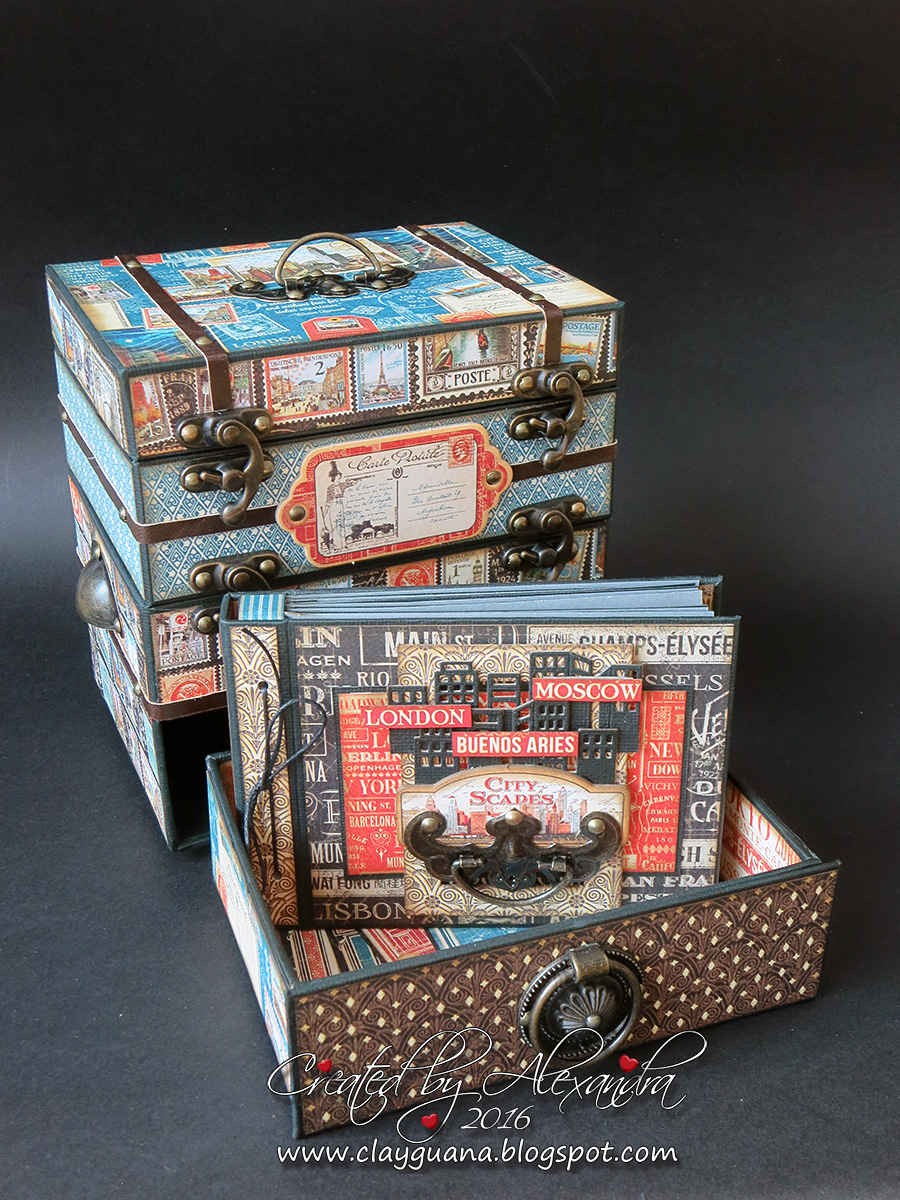
Without further ado, here is what I came up with:
What do you think? While designing this piece, I filmed a video and made into a tutorial on how to construct this trunk from scratch. The links to all the parts of the video will follow below.
The top compartment has a mini album with 7 pocket top loading pages. Each pocket page has a tag for additional pictures or journaling. I kept the cover simple, and created a shaker window, using a magnifying plastic sheet and some sequins. The magnifying sheet is not far enough from the picture, so it looks the same in size, though it still creates a nice "fish-eye" looking effect, when you move the album in your hands and look at the cover.
On the spine I used one of the chipboard tags and a brass embellishment with a glass pebble on top:
The album is stored in the top compartment, which flips open and reveals another storage place, where the magnifying glass is kept. Elastic bands, which are connected to the bottom of the compartment with a few brads, don't let the magnifying glass slip and move while the top section is opened.
This is how the Philaterium Trunk looks like when the whole top section is unfolded:
The bottom drawer is where the stamp holder is kept. The name of the project - Philaterium - was inspired by the word 'philately', which is the study of stamps and postal history and other related items.
On the stamp holder cover I used one more chipboard tag and a die cut from La-La Land Crafts with the buildings skyline. Isn't it perfect for this collection?
Most of the time, I'm creating the pages in my albums, using Kathy Orta's hidden hinge binding method, but this time I wanted to try something new. Since the pages are not bulky and don't have any embellishments on them.
I binded the pages using so called 'spacer' chipboard pieces and layered on top a protective sheet (made from the tracing paper). I think it looks like a real stamp holder, don't you think?
I had a tremendous fun creating this project and no matter what the results of the final round would be, taking part in the Design Team Call brought me a huge satisfaction and inspiration.
In the following photo you can have a look at the both of the albums and the trunk again:
My video overview of the Philaterium may be found on my You Tube channel:
And now to the tutorial!! :)
As you can imagine, creating the trunk takes time and that's why the tutorial consists of several parts.
The first one is about the basic construction:
The second depicts a speed process of attaching the metal parts and putting the parts of the trunk together.
The third is about creating the stamp holder album for those who are not bored and want to try creating one for themselves (ha-ha) :)
_________________ ** The links will be e-mailed to your PayPal registered address within 12 hours after the purchase**
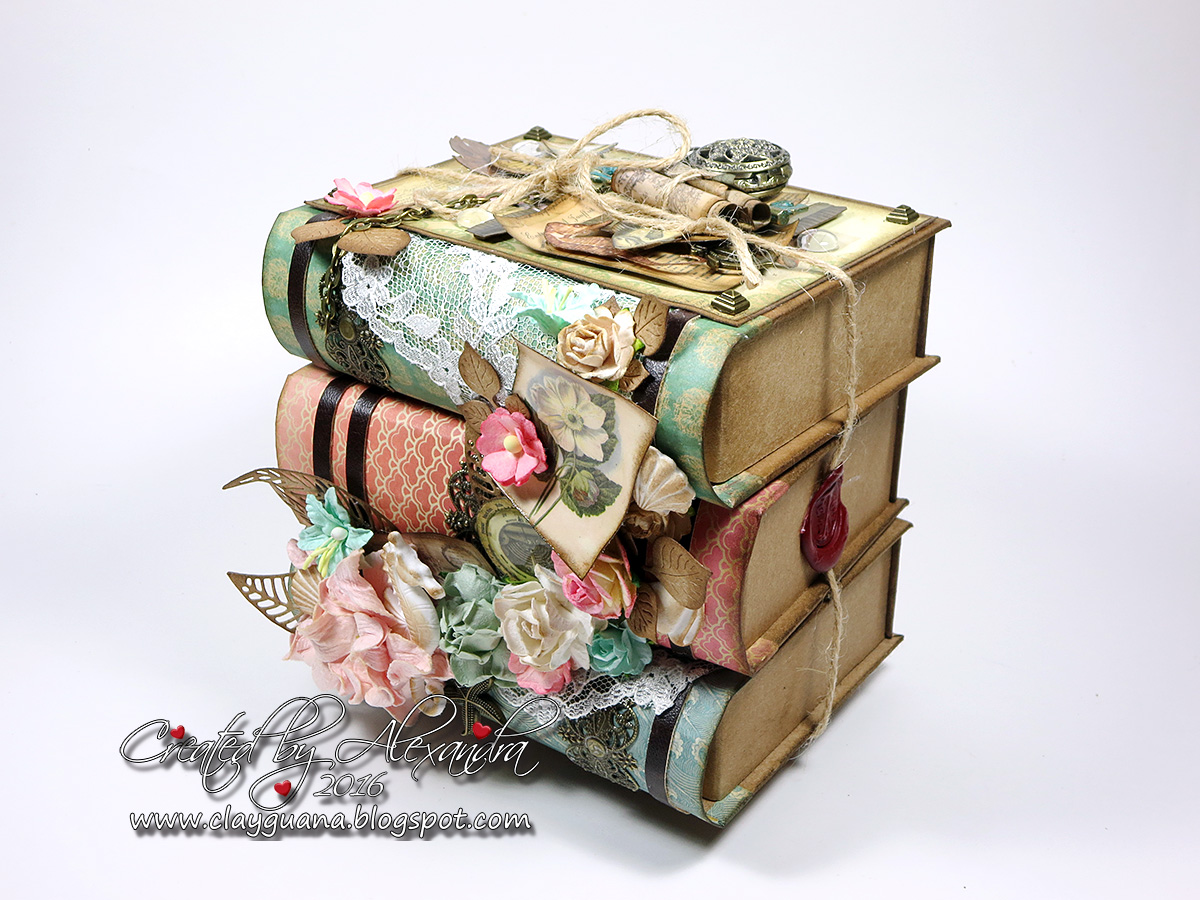
Without further ado, here are the pictures of my result:
And more close-ups:
Further, you can find a link to the video overview:
You will be able to purchase the kit for creating the 'Stacked Book Drawers' from "Photographs and Memories". I will edit this post and add a link to the kit, once it is ready.
Thanks for stopping by.
PS:
Who doesn't like when his art is appreciated bu others!? :)) I like a lot! Thank you everyone, who hit LIKE and commented!
First of all I would like to share the happy news with you all - I made it through the first round of the Graphic 45 DT call audition. There is the second round waiting for the top 30 finalists (which were announced here) and I hope to go on and inspire you again with my new project, which I have to create till the 17th of April.