07/08/2013 - This set was a winner @ Fab 'n' Funky Challenges
Hello dear friends!
How are you today? Hope everyone is feeling fine.
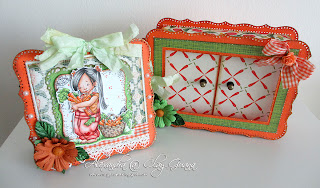
As some of you may (or may not) know, I love boxes :) In this post I'm sharing a new 3D box with double sliding top I've made, based on the tutorial written by Tara, and a matching card, with a wonderful image by Mo Manning - Carolina.
The digital stamp is colored with Copic markers of the following colors:
Skin: E000, E00, E21, E11, R20, E50
Hair: W7, W5, W3, W1
Carrots: YR18, YR04, YR02, YR000; YG67, YG45, YG23
Overall: R08, R05, R02, R000, T3
T-Shirt: YR24, YR15, YR12, YR01
I added lots of Stickles glitter on the card in general, and made some accents on the carrots. The basket is covered with Glossy Accents.
There are two tags with an embossed butterfly on them.
The inside decoration:
The back:
I wanted to say a couple of words about the tutorial. It is very precise and I had fun following it, though when the box was finished, I didn't like that the lids fall out of the box, and I thought of adding a slight enhancement to the original design.
Cut 4 pieces of card stock measuring 1" X 2". Score each of them 1/4" on the shorter sides and attach a score to these flaps. Then, adhere the hinges on the lids' back sides as shown below:
Place both of the lids so that the hinges will be located in the spaces between the bigger and the smaller boxes:
Now you are ready to glue down the upper decorative piece:
Thank you all for visiting me today!
I'm entering this piece into the following challenges:
1. Make a Set @ Fab n Funky
2. Summer @ Crafty Creations
3. Fancy Edges @ Let's Create
4. Anything Goes @ Avenue 613
5. Anything Goes @ Eclectic Ellapu
6. Summer @ Creative Belli blog
7. Summer Days @ Dream Valley Challenge


WOW hun, another amazing project and fab tutorial - love the colours and papers. Hugs, Claire x
ReplyDeleteWOW this is amazing and love how the box opens and stunning card.
ReplyDeleteluv
Debby
Wow! so lovely. And you altered it to be better - you are amazing.
ReplyDeleteGorgeous box, love the cute image, thanks for sharing it with us over at Let's Craft and Create.
ReplyDeleteFantastic again. Very colourful and creative. Thanks for share, for the tuto (I want to try with any one)and your clear appreciations. Elena F.
ReplyDeleteOh wow, this is fab! I love your bright colours and the box is fantastic!
ReplyDeleteThank you for playing with us at Eclectic Ellapu!
Sheena
xxx
I know i can always find something wonderful here. As usual this is totally stunning Alexandra, what a tone of work you put into this card and box set, it is outstanding. Have a great day.
ReplyDeleteHugs, Katie
Beautiful set, gorgeous box and card in lovely colours. Thanks for sharing with us at Fab'n'Funky this week.
ReplyDeletePat xx
OMG! SO many details and a great work! This is really stunning and impressive! Thank you for joining us at Dream Valley. Hope to see you soon!
ReplyDeleteHugs, Macarena DT
This is beautiful. I love the idea of the hinges on the sliding doors too. I think I will do this when I make mine as well. Thank you for joining us this week at Fab'n'Funky!
ReplyDeleteBeautifully crafted. Impressive indeed! Thank you for sharing with us at EE!
ReplyDeleteHow amazing! A beautiful card (terrific image of course) and as for that box.....well...I just agree with all the above comments. It's stunning!
ReplyDeleteStunning set love the box design. Thanks for joining us at Fab n funky
ReplyDeleteBeccy x
This box is simply gorgeous. thanks for idea and tutorial.
ReplyDeleteMarjeta