Wednesday, February 22, 2023

Wonderland Release - La-La Land Crafts - Day 6

Hello!

Today is the 6th day of the recent Wonderland release showcase from La-La Land Crafts. You can view all of the new products and also the makes of the design team members on the La-La Land Crafts official blog starting from Day 1

For the card that I would like to share with you today, I used "Marci in Wonderland" stamp. I really like how she looks!


I also made a shaker with the large teapot die from the 'Tea Set', and added the teacup on the side. Both of the pieces have a floral pattern, which was created with the help of the new Wonderland Stencil.

You can also spot some Chess figures and the Pocket Watch behind Marci. I think they are so beautiful! For an added interest, I glued down the flipped key holes (from the Funky Frames die set) in both corners of the card and embellished them with the little card suits.


Marci was colored with Copics:
Skin: E04, E11, E00, E000 + R20
Yellow: YR24, YR26, YR21, Y000
Blue: B39, B18, B16, B14, B12
White: W3, W1, W00
Black: N9, N7 N5, N3

Here you can find the list of all the LLLC products that I used:


Let's take a quick look back at what we had in this release:


Thanks for watching and have a wonderful rest of your day!

Tuesday, February 21, 2023

Wonderland Release - La-La Land Crafts - Day 5

Hello!

It is the Day 5 of the "Wonderland" release showcase from La-La Land Crafts. Have you already chosen your favorites? The dies and the stamps are so great and work perfectly well together, along with the papers and the stencils, of course. 

My today's card is using the pair of cards' characters from the clear stamp set call "Curiouser and Curiouser":


You can use the Playing Card Die for shakers, as well as make very realistic plain cards. Card suits of two sizes are wonderful for adding accents, too.


I have colored the stamped images with Copics:
Body: E42, E41, W0, W00
Faces: E04, E11, E00
Spades: N9, N7, N5, N3
Hearts:T6, E09, E07, R17
Gloves: W5, W3, W0

You can find the list of the products that I used below:


Have fun creating and thanks for stopping by today! Till tomorrow!


Monday, February 20, 2023

Wonderland Release - La-La Land Crafts - Day 4

Hello-hello!!

It is getting curiouser and curiouser, because there is another new release from La-La Land Crafts available for you to enjoy and it is Wonderland themed.

There are so many really cool dies and stamp in the release! You need to have a look at everything here.

The La-La Land Crafts design team members have started sharing their projects on Friday last week and you are welcome to visit the official blog if you missed anything. Day 1 is here.

Let me show you my card for today, featuring the Queen of Hearts Marci:


If you are a fan of "Alice in Wonderland" theme, you will find a lot of cool dies to choose from, as well as stencils and papers. I love the hourglass die and the chess figures so much!


Marci was colored with Copics:
Skin: E04, E11, E00, E000 + R20
Black/Grey: N9, N7, N5, N3
White: W3, W1
Red: T6, E09, E07, R17
Yellow: E37, E35, Y17, Y08


Here is the list of the products that I used for my today's card:

Now, let's have a brief look at what this release includes:


Thanks for your interest and please come back tomorrow for another card inspiration :)

Monday, February 13, 2023

Crafty Friends Tag/Card for La-La Land Crafts

Hello!

I hope everyone is doing fine this Monday. I must say that I'm struggling with crafting at the moment. I completely lack my mojo and truly hope you (other crafty people out there) are doing better than me.

My today's tag/card is for the La-La Land Crafts design team and I used one of the recently released stamp sets - Crafty Friends, along with some other new and old LLLC products. 


Since the new release was all about colors and being happy, I went with bright color choices for my card. I always appreciate how other people crate project in pastel color tone, but I myself am {almost} never able to make it look muted and shabby :) And how can I succeed in that if RED is one of my most favorite colors!? :)


I have created several layers here and used foam tape for all of them.


The cute critters were colored with Copics:
Cat
Face: E04, E11, E00 + R20
Body: N8, N6, N4, N3, N2
Nose + Heart: R37, R35, R32
Shirt: R85, R83, R12, R11 + R39
Paper: W5, W2
Dog
Face: E04, E11, E00 + R20
Body: E25, E23, E13, E21
Nose: N6, N4, N3
Shirt: YG97, YG67, YG63, YG25, YG21
Markers: C4, C3


Here is the full list of the La-La Land Crafts products that I used for my today's card:

Wednesday, February 8, 2023

La-La Land Crafts February 2023 Release - Fairy Marci

Hello!

Today is the last day of the new La-La Land Crafts release showcase galore and I have one more card to share with you. This time I used a cute Fairy Marci:


There is a bunch of various new die cuts on this card as well (please, refer to the links below to have a better look at them). I really like the mushrooms!


A new 'Happy Birthday' die also comes very handy!


Marci was colored with Copics:
Skin: E04, E11, E00, E000 + R20
Hair: R89, R85, R83, R81
Outfit: YG97, YG95, YG93, YG21
Wings: V28, V25, V22, V20 + BG000

Below you can find the link to the products:

Tuesday, February 7, 2023

La-La Land Crafts February 2023 Release - Monster Birthday

Hello friends!

La-La Land Crafts design team members keep on sharing cards which were created with the recent product release with all of you. If you want to have a better look at what the release includes, please visit my yesterday's post or click here.

Today I have a super simple, but fun card with the monsters from the new clear stamp set Monster Birthday


I did not use any patterned papers on my card, and decided to use only a new stencil with Paint Splatters for creating the background:


I colored the monsters with Copics:
Monster 1: V28, V25, V22, V20
Monster 2: EYG97, YG95, YG93, YG21
Horns: E47, E44, E43, E42

For creating the mustache and the glasses, I used one of the older dies - Large Christmas Ornament.

Below you can find all the links to the products I used for my today's card:
Monster Birthday Clear Stamp Set
Paint Splatters Stencil Set
Paint Splotches Die


I think these monsters will be perfect for Birthday cards or encouragement cards. What do you think?

Thanks for visiting me today! Tomorrow I have one more card to share :)


Monday, February 6, 2023

La-La Land Crafts February 2023 Release

Hello!

On Friday Feb3, La-La Land Crafts design team members started to share their makes with the products from the new release, which is all about colors and paint. 

Let's have a quick look at the graphics below, to get a notion about what you can expect from this release:


All of the new goodies are consolidated in the LLLC store here for your convenience.

My first card that I'd like to share with you today, features a rubber stamp with Painter Luka


I really like the new Paint Brush Die!! It is super fun! To add wooden design to the handle, I used one of the older background stamps - 'Wood Planks'.


For added accents, I used the Paint Splotches Die

The stamp was colored with Copics:
Skin: E04, E11, E00, E000 + R20
Hair: E18, E15, E13
Overall: B39, B37, B34, B32
Headband + Shoes: YG67, G24, G12, YG00, YG0000
Bucket: N9, N7, N5, N3
Shirt: E44, E43, E42
Roller: E35, Y19, Y18, Y06

Below you can find the links to all of the products I used today:


Thank for watching and please check back tomorrow for more inspiration :)


Thursday, February 2, 2023

Daisy Flowers For Your Cards - La-La Land Crafts Tutorial

Hello everyone!

I hope you are having a nice Thursday! It is my turn to share a tutorial over the La-La Land Crafts blog and I though I'd duplicate it here, too. 

I really love the Open Daisy Die & the Side Daisy Die, so I decided to use them for making pretty blooms for my cards.


Step 1:

Prepare your papers for both the flowers and the leaves, using your preferred colors of Oxide Inks. 
I dabbed the ink pads on top of a glass mat, sprayed some water in the inked area and after that started to "pick up" the color from the glass mat onto the watercolor paper. You might need to dab your ink on the mat and spray it with water a couple of times, till all the paper is colored to your liking. You can also use the heat gun to speed up the process of drying the paper. 


Step 2:

Die cut your flower blooms (yellow and pink, in my case), using the Open Daisy Die & Side Daisy Die:


Step 3:

Add some green distress ink (Peeled Paint) at the bottom of one of the die cuts as shown below:


Step 4:

Assemble your blooms (for now we have only been assembling the side daisies):


Step 5:

You can use a ball tool and shape the petals lightly, by putting the flower onto your palm and pressing on the tips of the petals lightly, curling them up.


Step 6:

Now, let's work on the flowers that we have die cut with the Open Daisy Die
Place your die cut flowers with the face down onto a foam mat, and use the ball tool again. Start pressing on each one of the petals with the tool, moving it from the tip of the petal towards the center of the flower. Once each one of the petals is curled up, flip the flower to its front, and lightly rub a ball tool in circular motions right in the center of the flower. This will "sink" it down just a bit.


Step 7:

Assemble the flower by adhering two/three layers of the die cut petals together. Use your ball tool to help adhere the layers:


Needless to say that three-layered flowers will look fluffier than the ones which have two layers only.    I think creating different variations is the best!


Step 8:

Let's work on the leaves now. You will use your green watercolor paper to die cut various leaves from both of the daisy sets. I decided to add more "Peeled Paint" Distress Ink around the edges of the leaves, to make them look more dimensional. 


Step 9:

Use the ball tool and shape the leaves, similarly to how we shaped the petals. Turn the leaves over and shape them on both sides, till you get the desired look:


Step 10:

I decided to add gold acrylic paint splatters to all of the blooms and leaves. 
 I think NOW they look just perfect!


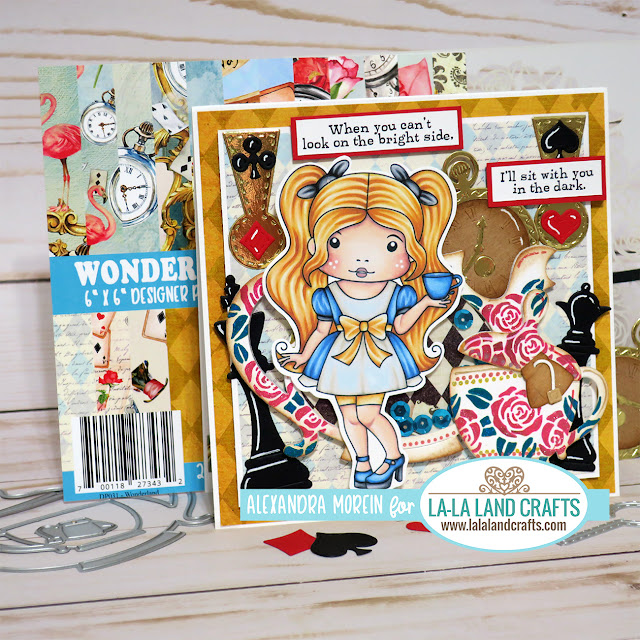
Below you can see how I used the finished flowers for making three CAS cards. To the open daisies I also added seed beads in the centers. Don't they look beautiful?!


Thanks for stopping by! I hope you find this tutorial useful.