Today my project is shared on the Graphic 45 official blog and it means that I can also share it with you here.
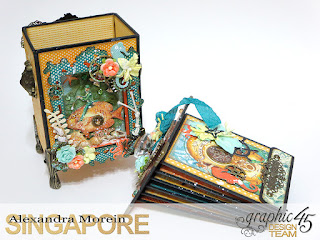
I created a little boxed mini album with the "Voyage Beneath the Sea" collection. The album is loaded into the box from
the top, while the binding is attached to the lid and holds 6 pocket pages. A
magnet is preventing the inside photo mats to fall out of the pages when the
album is extracted from the box.
On the front you will
find shadow boxes with the cutouts from several of the “Voyage Beneath the Sea”
paper sheets. If you like to add shells, cogs and sea themed die cuts to your
projects, this paper collection is for you.
In the tutorial (the link to which is at the bottom of the post) I am showing how to construct the base box,
give you the measurements for putting the shadow boxes together, share a
process of embellishing them and finally explain how to create the pages.
The finished project measures 5” tall (not including the
feet and the knob on the lid), 4” wide (not including the ornate pulls on the
sides) and 4” deep (with both of the shadow boxes). The most of the project is
done using the 6”X6” paper pad and several 8”X8” sheets (from which I cut out
the images for embellishing the shadow boxes and the inside pages of the
album).
Being dimensional, the finished project can serve a nice
decoration piece.
I hope you will enjoy the tutorial and find it inspiring.
Here are some handy measurements for you to use (I know the sound of the video was very bad, but it's impossible to do anything about it now).
So....
Chipboard for the box:
3.5 " x 4.5" (2 pc)
4.5" x 2 5/8" (2 pc)
3.5 x 2 5/8" (1 pc)
4" x 3 1/8" (1 pc) - the lid
Card stock piece for creating the hinged binding (to be attached to the lid of the box):
3 1/4" x 8 5/8"
Score at 1 1/8" from the left and right (on the lond side). All the spacing in between those lines should be scored at every 3/8".
Card stock for the pages:
7 1/8"x 4 1/4" (6 pc)
scored at 3/8" and 3 3/4" on the long side
Card stock for the inside tags:
4 7/8" x 3 1/4" (6 pc)
score at 1" on the long side
Here is the list of the used products:
Voyage Beneath the Sea 8x8 Pad
La-La Land Crafts sea-themed dies
Tim Holtz Ornate Frame #2 die
Assorted metal embellishments
I Am Roses flowers
Prima Mini Stones
The link to the video tutorial:
Thanks for stopping by today!


Александра, миник просто суперский , очень вдохновляет ...очень интересное видео...когда вы все успеваете?
ReplyDeleteСупер, работа! Как всегда с изюминкой!
ReplyDeleteSimply gorgeous.
ReplyDeleteMarjeta
What can I say? This is stunning, so much work and innovation here, if I mention everything I love it would simply take me all day! :) xx
ReplyDeleteOmg......its awesome.....the way u show the details is really worth a ton.....loved it :)
ReplyDeleteWhat is the thickness Of your chipboard? Absolutely beautiful !
ReplyDelete